Android App using Retrofit and Restful Web Services
Build an android app that helps us to retrieve and send data to the web service with the help of Retrofit.
Today, we're going to share the steps to create an app that will connect to web services with Retrofit that manage HTTP request and web service integration. We'll set up local web servers. And we'll consume these web services using an android app.
Features :
Send data to the web service
Retrieve data from the web service
Integrating third-party APIs such as network calls
What is Retrofit?
The retrofit library was developed by Square to handle REST API calls in android apps. It is a type-safe REST client for android and JVM. To authenticate and interact with APIs and send network requests with OkHttp, Retrofit comes into the picture.
To download JSON data from a web API, Retrofit comes in handy. It also manages the process of creating, sending, and receiving HTTP requests and responses.
Advantages of Retrofit:
Fast
supports request cancellation.
supports dynamic URLs.
establish direct communication with web services.
supports both synchronous and asynchronous network requests.
We need to add a dependency in the build.gradle file to work with retrofit.
implementation 'com.squareup.retrofit2:retrofit:2.9.0'
STEP 1:
Create static data inside SampleData.kt file.
Create a data class that helps to hold data.
We will retrieve the data using an adapter and show data with the help of the recycler view.
Create an adapter class that works as a bridge between UI and data source.
Few activities to show the list of students' names, details, etc ...
data class of Student:
data class Student(
   var id: Int = 0,
   var name: String? = null,
   var about: String? = null,
   var department: String? = null
)
Source code - Static Data Added
Simply run the project and will show like this -
STEP 2:
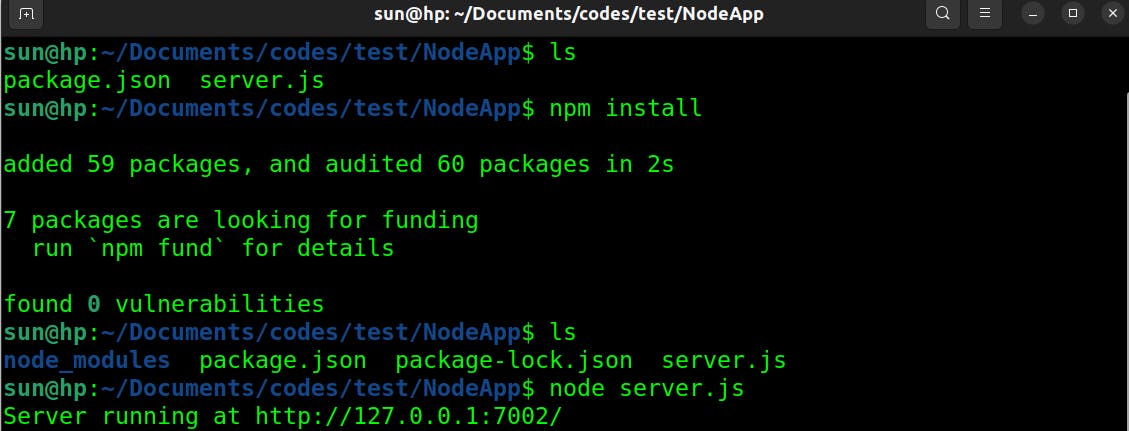
Now it's time to create a local server using NodeJS.
If you want to create your own server.js file, you do so.
I have already created one
download this server.js and package.json file
Create one folder and save two files inside that folder (I save these files inside the NodeApp folder )
$ npm install
After running the above command, you can see one file is showing, name: node_modules.
Now, run this command:
$ node server.js
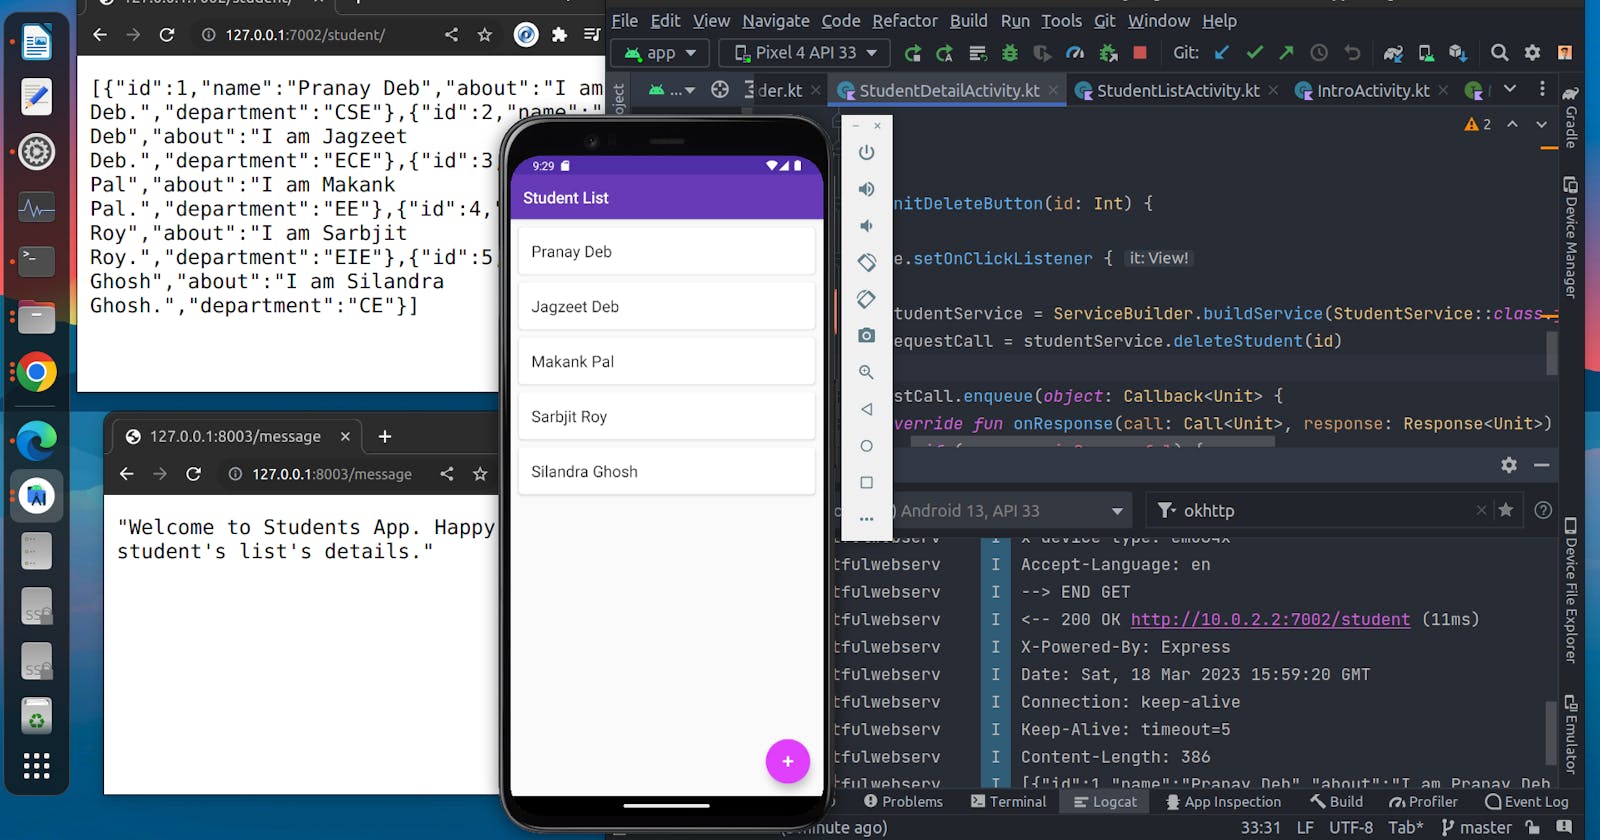
Now, you can see the server is running at this port, see the below video of what we get inside this '/student'.

Get Request Using Retrofit:
Add this getStudentList() inside StudentService.kt file, to get the list of students.
@GET("student")
fun getStudentList(): Call<List<Student>>
Note: We'll implement how to parse JSON using a GSON converter with Retrofit.
implementation 'com.squareup.retrofit2:converter-gson:2.9.0'
For serialization to and from JSON, we use a Converter i.e. Gson Converter
In our Retrofit instance, we can add the converter through this line:
private val builder = Retrofit.Builder().baseUrl(URL)
    .addConverterFactory(GsonConverterFactory.create())
    .client(okHttp.build())
Note: below code is very clean and informative, we'll use this many times and implement it for network calls in the background thread. If there is any error occurred, we'll efficiently handle it with specific details.
val studentService = ServiceBuilder.buildService(StudentService::class.java)
      val requestCall = studentService.getStudentList(queryHashMap)

      // Note for future ref: Suppose user by mistake pressed a button to download a file
      // to cancel it we'll use requestCall.cancel().

      // requestCall.cancel()

      requestCall.enqueue(object: Callback<List<Student>> {

         override fun onResponse(call: Call<List<Student>>, response: Response<List<Student>>) {
            if (response.isSuccessful) {
               val studentList = response.body()!!
               student_recycler_view.adapter = StudentAdapter(studentList)
            } else if(response.code() == 401) {
               Toast.makeText(this@StudentListActivity,
                  "Session expired. Login again.", Toast.LENGTH_LONG).show()
            } else {
               Toast.makeText(this@StudentListActivity, "Failed to retrieve items", Toast.LENGTH_LONG).show()
            }
         }

         override fun onFailure(call: Call<List<Student>>, t: Throwable) {
            Toast.makeText(this@StudentListActivity, "Error occurred $t", Toast.LENGTH_LONG).show()
            Log.i("OnFailure: ",t.toString())

         }
      })
OkHTTP Logging Interceptor:
An OkHttp interceptor can be applied as a network or application interceptor. It also logs request and response information. Interceptors help to monitor the API call and print the logs in the Logcat console.
add okhttp-logging-interceptor inside the build.gradle file.
implementation("com.squareup.okhttp3:logging-interceptor:4.10.0")
Source code - List of students fetched using HTTP Get Method
STEP 3:
Now, it's time to fetch each student's details when you click on the student's name.
Get each student's details by path parameter and using their id :
@GET("student/{id}")
fun getStudent(@Path("id") id: Int): Call<Student>
Source code: Student's details fetched
STEP 4:
In this step, we'll fetch details using the query parameter:
- query parameter:
@GET("student")
fun getStudentList(@Query("department") department: String?): Call<List<Student>>
Using the query parameter, we'll apply it to the department attribute. We'll fetch all the students whose department is 'CSE'.
val requestCall = studentService.getStudentList("CSE")
Source code:
Student's details fetched using Path Parameter
Student's details fetched using Query Parameter
STEP 5:
QueryMap Implementation:
Here, we'll filter data using a query map where we'll fetch one student based on two different attributes ( using count = 1 and department = 'EE' ).
@GET("student")
fun getStudentList(
    @QueryMap queryHashMap: HashMap<String, String>
): Call<List<Student>>
Fetched data using Hash Map:
val queryHashMap = HashMap<String, String>()
queryHashMap["department"] = "EE"
queryHashMap["count"] = "1"

val requestCall = studentService.getStudentList(queryHashMap)
output in logcat:

Watch below video to get idea:
Source code: Specific details fetched using Query Map
STEP 6:
Reason to create another server to get messages when working inside the same application.
One server is running at http://127.0.0.1:7002/
Now, we'll create another server.js file :
var express = require('express');
var app = express();
var fs = require("fs");

var bodyParser = require('body-parser')
app.use(bodyParser.json());
app.use(bodyParser.urlencoded({
    extended: true
}));

var msg = "Welcome to Students App. Happy to provide student's list's details.";

app.get('/message', function (req, res){
    res.end(JSON.stringify(msg));
})

app.get('/', (req, res) => res.send('This host will help to send message to the app.'))


var server = app.listen(8003, '127.0.0.1', function (req, res) {

    var host = server.address().address
    var port = server.address().port

    console.log(`Server running at http://${host}:${port}/`);
})
We'll create one file package.json file (as mentioned previously). Both server.js and package.json files keep inside another folder ( give the name 'NodeApp2')
Run the following commands:
$ npm install
After running the above command, you can see one file is showing, name: node_modules.
Now, run this command:
$ node server.js
Now, this server is running at http://127.0.0.1:8003/
Create MessageService.kt:
interface MessageService {

    @GET
    fun fetchMessage(@Url url: String): Call<String>
}
Get full instructions in the below video:
Source code: Fetched Details from two servers at a time
STEP 7:
This step is one of the most important as we'll create students using the POST method.
Add the below code inside StudentService.kt:
@POST("student")
fun addStudent(@Body newStudent: Student): Call<Student>
Make sure your server is running and open the URL with the port number in the browser's tab. Add the students and try to check whether it is created or not.
We have implemented this. Watch the below video to get the info:
Source Code: Student added using HTTP Post Method
STEP 8:
Update Student's Details using PUT method:
Add the below code inside StudentService.kt:
@FormUrlEncoded
@PUT("student/{id}")
fun updateStudent(
    @Path("id") id: Int,
    @Field("name") name: String,
    @Field("about") about: String,
    @Field("department") department: String
): Call<Student>
If any detail is changed, we'll fetch it first:
val name = et_name.text.toString()
val about = et_about.text.toString()
val department = et_department.text.toString()
We'll update students using a request call with the given details.
val studentService = ServiceBuilder.buildService(StudentService::class.java)
val requestCall = studentService.updateStudent(id, name, about, department)
Source Code: Student's details updated using HTTP Put Method
STEP 9:
Student's Details Deleted Using HTTP DELETE Method:
In this step, we'll implement how to delete a student's data using its id through the HTTP DELETE method.
Add the below code inside StudentService.kt:
@DELETE("student/{id}")
fun deleteStudent(@Path("id") id: Int): Call<Unit>
Source code: Delete Student Data using HTTP DELETE
STEP 10:
HTTP Headers Implementation:
To add metadata info in an API request and response, HTTP Headers are used. Few examples of Headers: Content-Type, App Version, etc.
Watch two dedicated video, to get idea:
Part - I
Part - II
Source Code: HTTP Headers Implementation
Slow Connection Handled:
Note: If you have a slow connection, you can wait for 15 seconds and then show one retry button to refresh otherwise it'll give a bad impression of the user interactivity.
private val okHttp = OkHttpClient
    .Builder()
    .callTimeout(5, TimeUnit.SECONDS) // Implement retry button for time-out purpose
    .addInterceptor(headerInterceptor)
    .addInterceptor(logger)
Source Code: Slow Connection Handled
Request Cancellation:
Note for future ref: Suppose the user by mistake pressed a button to download a file. So, how to stop it?
To cancel it we'll use requestCall.cancel().
requestCall.cancel()
Source Code: Request Cancellation
I hope this blog helps you to develop an android app using Retrofit. If you find this helpful, share this blog on your social and like, and comment below.
Thank you.
Source code:
Connect with me
LinkedIn - Suraj Maity
Twitter - Suraj Maity
